
Audio Fades Explained: How to Create Clean, Seamless Edits

Updated: Jul 24
A good edit is one you never hear.
That's what fades are for.
Every time you edit audio, you cut a waveform.
If the waveform suddenly jumps, you'll hear it as a click.
A tiny fade smooths the transition.
It takes seconds to apply, but it's one of the simplest ways to make your edits sound cleaner and more professional.
Why Clicks Happen
When you make a cut, the waveform suddenly has a new start or end point.
If those points don't join smoothly, you'll hear it as a click.
The fade isn't hiding the click.
It's preventing it from happening in the first place.
Instead of forcing the waveform to change instantly, the fade gradually moves the waveform to or from silence.
The result is an edit that simply disappears.
Tiny Fades Make a Huge Difference
Most fades don't need to be long.
They only need to be long enough to prevent the click.
A fade of just 1–5 milliseconds is often enough to prevent clicks without changing the sound itself.

You don't hear the fade.
You hear the absence of the click.
Once you get into the habit of adding tiny fades to every edit, clean edits become automatic.
What Is a Zero Crossing?
You may have heard engineers talk about editing at a zero crossing.
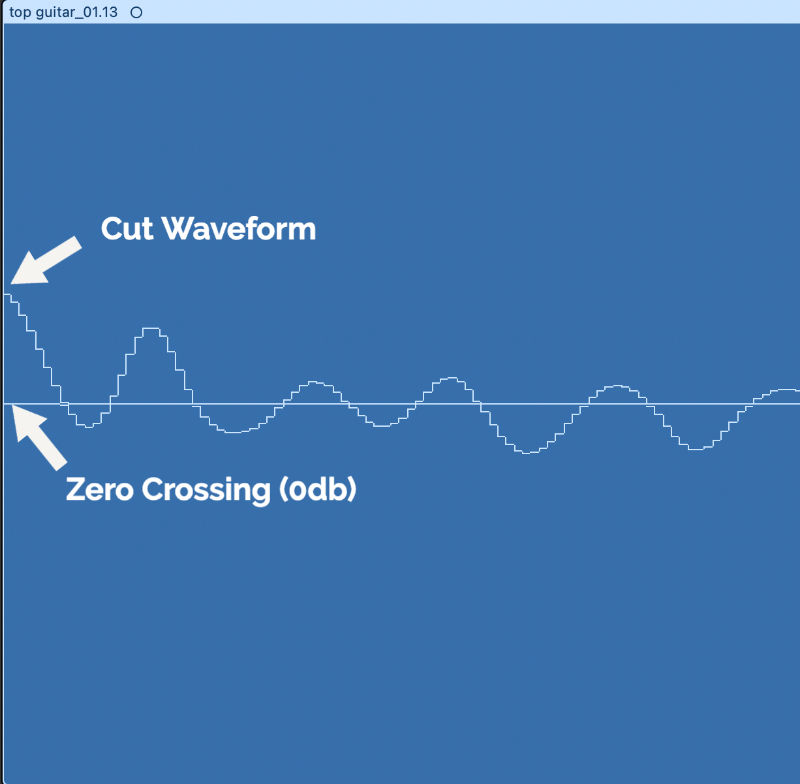
This is simply the point where the waveform crosses the centre line.
Because the speaker isn't moving forwards or backwards at that exact moment, it's naturally a cleaner place to make an edit.
Even then, I still use fades.
Not every edit lands perfectly on a zero crossing, and a tiny fade adds an extra layer of protection.
Choosing the Right Fade
Different edits need different fades.
Knowing which one to use is straightforward once you know what each fade is trying to achieve.
Fade In
A fade in gradually increases the level from silence.
Use it whenever audio starts.
It prevents clicks and creates a clean start.
You'll use fade ins constantly on vocals, drum edits, synth recordings and any recorded audio.
Fade Out
A fade out gradually reduces the level back to silence.
Use it whenever audio ends.
It prevents clicks and creates a clean ending..
Like fade ins, you'll probably use fade outs on almost every edit you make.
Crossfade
A crossfade is for joining two pieces of audio together.
One clip fades out while the next fades in.

Instead of hearing the edit, you hear one continuous performance.
Crossfades are especially useful when editing vocals, guitars, ambience and comping multiple takes.
Fade Shapes
Most DAWs let you change the shape of a fade.
Some fade at a constant rate.

Others stay louder for longer before dropping away.

Some rise quickly.
Others rise more gradually.
For removing clicks, the shape usually doesn't matter.
A short fade of almost any shape will do the job.
Longer fades are different.
A gentle curve often sounds more natural on vocals and sustained instruments.
Steeper fades can work well on drums and percussion.
The important thing isn't finding the perfect curve.
It's understanding that different sounds sometimes benefit from different fade shapes.
Automatic Fades
Some DAWs make this even easier.
Ableton Live automatically applies tiny fades to audio clips in Arrangement View by default.
It's one of those features you hardly notice until you switch to another DAW, but it does a great job of preventing clicks without you having to think about it.
Logic Pro can do something similar.
With no regions selected, use the Region Inspector to set a default Fade In and Fade Out.

From that point on, every new audio region will automatically receive those fades.
It's a small setting, but once it's enabled, clean edits simply become part of your workflow.
How I Use Fades
Adding fades has become automatic.
Every edit gets a fade.
Most are only a few milliseconds long.
Just enough to smooth the waveform.
Not enough to change the performance.
Whether I'm editing vocals, tightening drums, cleaning up synth recordings or preparing stems, fades are simply part of the workflow.
Final Thoughts
A fade isn't there to be heard.
It's there to make sure the edit isn't.
Whether it's a tiny fade on a kick drum, a crossfade between two vocal takes or automatic fades across an entire session, these small adjustments make a huge difference to how polished your edits sound.
A good edit is one you never hear.


Comments